Tuesday, August 31, 2010
Communicating Change to Your Environment Effectively
"Any change, even a change for the better, is always accompanied by drawbacks and discomforts." ~Arnold Bennett
Some of the biggest mistakes I have made as a professional have centered around insufficiently communicating change and its effects to the user community of the project I was working on. If you look at the statistics from IT Cortex, I am hardly alone. They cite a full 57% of the survey respondents listed bad communications as the top reason for project failure. If that is the case, what can we do the help ensure that we don't fall into the same traps again? IT can be summed up in two simple words that have big consequences: Empathy and Participation
Monday, August 30, 2010
Not Changing Really Isn’t an Option
"It is not necessary to change. Survival is not mandatory." ~W. Edwards Deming
No matter how much we try to resist it, change is all but guaranteed. Even in a recession, change continues to roll along in the IT space, even if we would rather not invest at this time: Vendors continue to churn out updates to their software, support contracts continue to come due, warranties continue to expire…
One key understanding that needs to be developed with management, especially in this economy, is that there is a certain degree of change that will be externally forced upon the organization by the past application choices they have made.
Saturday, August 28, 2010
Don’t Simply Believe, Test
When it comes to your environment, you can't really use Alice's disaster recovery plan from Dilbert or just sit around singing "I Believe We Can" from Phineas and Ferb. You actually need to test your plan regularly to make sure that you are truly covered. Now this doesn't need to be a weekly or monthly burden on you or your staff, but there is a list of things that you should be doing at least one of each quarter on a scheduled basis.
Friday, August 27, 2010
Backing up the Infrastructure Configs
If you are anything like me, you tend to forget about protecting the very fabric that ties everything together for your environment, the infrastructure components: firewalls, routers, switches, etc. To some extent this is understandable as these devices have become extremely reliable and, in most organizations, there is not the same degree of change within the infrastructure space as other areas. Even if you can understand it, the underlying fact is that when the infrastructure has a problem, everyone has a problem.
Luckily, most of the infrastructure devices in the industry are still using text configuration files to control their hardware. This coupled with the relatively low degree of change makes infrastructure backups a relatively simple task.
Thursday, August 26, 2010
Use VSS to Expand your Short-Term Restore Options
If your organization is anything like nearly every other organization I have worked with, you will find that the vast majority of file restore requests are from the very recent past. In fact, IT Today cites that industry-wide a full 40% of all restore requests are from the last 7 days. If the lion-share of all restore requests are going to be from such a small window in time, why not set yourself up to better service those requests? Especially when there is no extra software to buy and only a small price to pay in storage.
Every version of Windows Server starting with Server 2003 (Workstation OSes had this feature beginning with XP) has included a feature called Volume Shadow Service or VSS, which is capable of taking "snapshots" of the file system at frequent intervals, so that a view of what the system looked like at the specified time can be quickly produced. Unfortunately, very few of the organizations that I have worked with have actually taken advantage of this feature. Imagine the surprise on your user's face, when they ask for a file or folder from yesterday because they accidentally overwrote or deleted it, and you ask them what time they would like it restored from.
For details on how VSS works, see the Wikipedia article on VSS.
In the strictest sense of the word, VSS is NOT a disaster recovery technology as it is dependent on the file system that it is stored on. Since that file system is on the same server as it is protecting (and typically on the same volume as the protected data), you can quickly see that VSS cannot be guaranteed to be available to restore from should the server itself fail.
In a VSS implementation, you set aside a portion of a disk volume to be used for VSS Snapshots. This space is typically a part of the original volume, so there is no repartitioning necessary. You then setup a schedule of when the system should take snapshots. When the system runs out of space in its snapshot area, it simply removes the oldest snapshots until there is sufficient space for a new snapshot.
The first step in implementing a VSS solution is estimating the amount of disk space you need for your snapshots. There are a couple of ways to get a good estimate of the volume of the amount of change your system undergoes.
- If you do incremental backups of the system in question, simply use the average volume of backups for a period of time
- If you do not do incremental backups, simply run ROBOCOPY in list mode with the MAXAGE argument to see the volume of files that are changing per day or week.
To actually enable VSS on a disk volume, simply right-click on the volume in My Computer, Explorer, or Disk Management and choose Properties. Once the properties windows appears, select the Shadow Copies tab. You will then see a screen similar to the following:
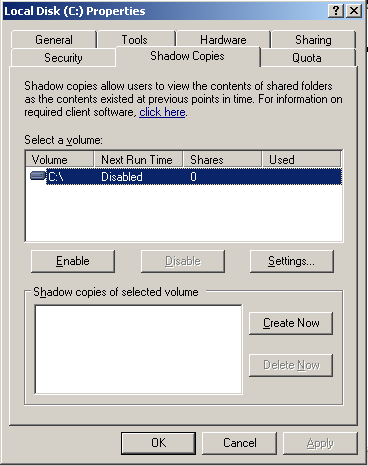
While you can simply click on the Enable button, I wouldn't recommend it as the defaults are likely not what you would choose on your own. The best course of action would be to select the Settings button, which will produce the following screen:
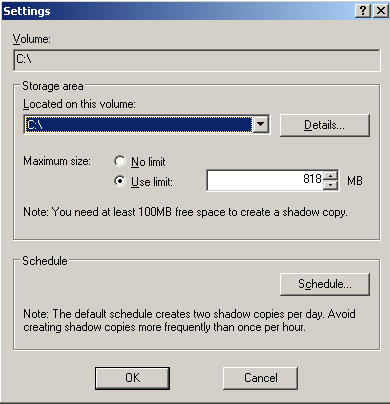
In most environments I have been involved with, there is not a separate volume on the system available for VSS snapshots and as VSS Snapshots should not typically be relied upon for true disaster recovery the default of placing the snapshots on the same volume as the data is acceptable. Simply enter in the amount of space you wish to reserve in the Use limit field. By default, the system will take 2 snapshots per weekday: 1 at 7AM and 1 at 12PM. If this is to your liking, simply click ok, and you are done. If you are anything like me, you would prefer more granularity than that. To change the schedule, simply click on the Schedule button and you will be presented with a screen similar to the following:

In most of the implementations I have been involved with, the multiple schedule use has been found to be unwieldy. As a result, most implementations I have seen have removed the second schedule, the 12PM item, and instead used the repeat task options available under the Advanced button options to have snapshots taken every hour or 2 during the business day. Click Ok to all of the windows and you are all set. Snapshots will begin to be made at the prescribed intervals.
Ok, we have all been in the situation where a server suddenly is nearly out of disk space. If you encounter this situation on a VSS enabled volume, simply lower the amount of disk space available to the VSS snapshots. The system will then begin removing older snapshots to meet the new, lower threshold.
To browse or restore historical files from a VSS volume, simply right-click on the folder you wish to view from any VSS enabled client (XP and newer OSes) and choose properties. Navigate to the Previous Versions tab. Select the snapshot from the time you wish to browse and click Open. Find the file(s) or folders you wish and view, copy, or move them as you need to.
Even without including the potential productivity gains from the end-user community due to less lost work, VSS quickly pays for itself as it is rare for a VSS restore to take more than a couple minutes. This allows you and the other support staff members to complete the restore request far quicker for the end-user community and move on to the next request.
Wednesday, August 25, 2010
Backup your AD Configuration
When you sit down and think about it, if you run a "Microsoft Shop" just about everything in your network environment likely relies on AD at some level. Whether it is the user accounts themselves and their associated mailbox properties for Exchange, the service accounts used by your applications, Group Policy Objects controlling workstation behavior, or possibly your infrastructure components due to DHCP, DNS, or even IAS. While Active Directory fully supports replication of all relevant fields and materials, there is still a need to get an offline backup of these vital materials. While no one truly wants to contemplate the scenario that would lead to such a restore, I have needed to assist at least 2 customers through this process; both due to virus infection. Lucky for me, they both had current backups of their AD environment using the process below due to prior consulting engagements.
Happily, getting a backup of your AD environment is an easy task and all of the tools needed have already been included with the operating system itself. Believe it or not, lowly NTBackup has a real purpose even in an enterprise environment and that purpose is snapshotting your AD environment. While many high-end backup systems do have plug-ins to backup AD, using them in a real DR scenario often adds a substantial amount of time to the recovery effort as many of them need an AD account just to run.
The first question is where to make the backup from. Ideally, you should have backups of 2 domain controllers in each domain of your forest. One of which should be made from a server holding an operations master role other than the RID Master, which should never be restored.
The 2nd question is where to write the backups to. You should choose a media that doesn't rely on a ton of other software or services in order to be read. Given the size of most AD backups and the fact that you don't need "point in time" restores of AD, flash drives have proven very effective at storing AD backups. If you are worried about the potential of your AD backup being used as a means of gaining access to your organization, feel free to use an encrypted flash drive such as those produced by IronKey.
For Windows 2003 domain controllers, all you need to do is run the following command from the appropriate domain controller to make the actual backup,:
Ntbackup backup systemstate /f "Path to the backup file"
For Windows 2008 domain controllers, NTBackup has been replaced by Windows Server Backup. Windows Server Backup is not installed by default on Windows 2008 systems. To install Windows Server Backup, go to Start -> Administrative Tools -> Server Manager. From there, click on Features, then Add a Feature. You want to add the Windows Server Backup feature. Once installed, the following running the following command from the appropriate domain controller will make the actual backup:
wbadmin start systemstatebackup –backuptarget:"path to backup folder"
This command line can be written to a BAT/CMD file for running from a scheduled task or manual process. It is important that the backup file get moved to media that can easily be transferred offsite in the event of a disaster.
Making the backup is only half the battle. One needs to be able to actually restore from it in the event of a disaster. To restore AD from this backup, one needs to follow these high-level steps for each domain in the forest, starting with the top most domain.
For Windows 2003 Domain Controllers:
- Build up a stand-alone server using the same OS version as the backup was taken from
- Place a copy of the backup file somewhere on the new server's filesystem
- Reboot the server and press F8 at the splash screen
- Select Directory Restore Mode Option
- Perform the restore from the Backup file
- Seize all FSMO roles held by nonexistent servers
- Cleanup the AD records for the DCs that no longer exist using NTDSUTIL
- Build up a stand-alone server using the same OS version as the backup was taken from
- Install Windows Server Backup using the steps above
- Place a copy of the Backup file somewhere on the new server's file system
- Run bcdedit /set safeboot dsrepair to instruct the system to boot into recovery mode
- Reboot the server
- At the login screen, select "other user". Enter ".\administrator" and enter the DSRM password for the server and press enter.
- Click Start, right-click Command Prompt, and then click Run as Administrator
- Run wbadmin get versions -backuptarget:"path to backup folder" -machine:"new dc name"
- Identify the version you want to restore. You will need to identify it exactly in the next step.
- Run wbadmin start systemstaterecovery -version:"version to be restored" -backuptarget:"path to backup folder" -machine:"new dc name" –authsysvol –quiet
- Run bcdedit /deletevalue safeboot to instruct the system to boot normally
- Reboot the server
- Seize all FSMO roles held by nonexistent servers
- Cleanup the AD records for the DCs that no longer exist using NTDSUTIL
Hopefully these steps are never needed, but it is good to know where to find them if they are ever needed.
Tuesday, August 24, 2010
Backing up Print Server Configs
Print servers are among my least favorite systems to have to recreate from scratch. Finding the right drivers for a plethora of different printer models is only the first step in the process. You then need to make sure that you have the right network and share settings for all the printers; then comes the fun of setting paper sizes, tray assignments, default finishing options, etc. Even in a small environment, it's enough to drive someone insane. Don't make the assumption that a couple of organizations I worked with did and find out the hard way that a System State Backup of their print server does not include the printer configs.
Fortunately, there is an easy way to address print server backups and there are only a couple "gotchas".
- You need to put the backup process in place BEFORE your print server fails
- This approach will only address restoring printers to a like OS. I.e. Windows 2003 32-bit -> Windows 2003 32 bit, not Windows 2003 -> Windows 2008 (If you are doing a scheduled upgrade, use the Print Management Snap-in)
- This approach will not address printers that store files outside of the Print Spooler folder structure, so many personal inkjet printers will not be covered
Note: The latest version of PRINTMIG for Windows 2003 does work in a Windows 2008 environment. I have not tested it with Windows 2008 R2 though. It may work. It may not.
Fortunately, PRINTMIG includes the ability to be controlled from the command line, so automating the backup process is simple. If you want to capture the print config to a CAB file of the same name as the server stored in the c:\backups folder, you simply need to setup a scheduled task to run:
PRINTMIG –b c:\backups\%COMPUTERNAME%.CAB
Then it is a simple matter of capturing the created CAB file to your backup media.
If you wish to restore, the configuration, you can simply run PRINTMIG and choose the restore option from the menu, or run:
PRINTMIG –r "Path to CAB File"
Now if you experience a print server failure, it is a simple matter of building a new server with the same name as the previous print server and running the PRINTMIG utility to restore the previous printer settings and drivers. If you need to build the server as a different name, no problem, PRINTMIG will restore the printer settings, to the new server regardless of name; however you will need to make other arrangements to change all of the end-user printer mappings to point to the new server.
At a previous employer, we had moved our print servers almost exclusively to dedicated VMs on VMWare's ESX server. This is because we could use a machine template and PRINTMIG to recreate a brand new print server in <15 minutes in the event of a system failure.
Monday, August 23, 2010
Backups: What and How
For this second week's topic, I thought that we should discuss backups. Every IT administrator I have ever met has had the fundamental need to have a backup of everything firmly engrained in their psyche. Some have had this need handed down from those before them; others from direct experience of not having them. Regardless of your past experiences, this need is likely there; but does everything in the environment need to be treated the same way? Most backup programs seem to think so; otherwise, there would be simpler and cheaper ways within their systems to have multiple media rotations and better support for "cheap" USB media for some materials.
Tape has a very proven track record and I am not saying that tapes should be avoided by any means. I am merely suggesting that tape may not be the best media for some of the data in an organization. Tape is an excellent method of retaining data for long periods of time, but is that really needed in all cases? Individual tapes have a relatively short life span when you look at the number of "write cycles" they support. As a result, tape becomes rather costly when it comes to backups with a short retention time as you just end up replacing the tapes in that rotation much more frequently.
If you take a hard look at the data in your organization that should be backed up, you will likely find that you can divide the materials into 2 categories: Data with a long-term retention need and data with only an immediate disaster recovery need.
Most user data (home drives, file system shares, mail, etc.) is going to fall in the first category. This is because one could reasonably expect a legitimate request for what a particular folder or mailbox looked like 3 months ago. It is this type of data that most backup systems are really meant to handle.
A fair number of items that fall within the IT group though do not have a need for that type of long-term retention. Would you really ever have a need for what drivers a print server was using 6 months ago? Would you really have a need to restore a workstation with an image that was replaced a year ago? These items really only need to be backed up to handle equipment replacements in the event of a disaster, so you only need to keep as many copies as is necessary to ensure that your DR need is met. Items that will likely fall into the DR-only need for your organization:
- Print Server Configs
- AD Backups
- Infrastructure (Switch/Router/Firewall/etc) configs
- System Images
- Software Installation Packages
- Archive Materials
- Incremental copies using a utility like ROBOCOPY or RichCopy to a USB Flash Drive/External Hard Drive that can be stored offsite
- Cloud-based backups from companies like Carbonite, iDrive, or Axcient
- Simple, offsite DVD copies of materials that don't change frequently, like system images
- A monthly tape rotation that is only kept for 2-3 months
Saturday, August 21, 2010
Step 5 - Setup Public TLS
For those organizations that wish to secure as much of their mail transit as possible, it is necessary to configure Public TLS for the Internet-facing connectors. If you have a single Edge or Hub Transport server handling all of the organization's mail traffic, this process is simple. If you have separate Send and Receive servers, multiple sites with public connectors, or both, it is simply repeating the same 4 step process for each of the public facing servers.
Step 1 – confirm the FQDN
It is important to make 110% sure that you request the certificate with the proper name to prevent certificate errors due to certificate mismatches. The name you need to register the certificate for needs to match the FQDN that your connector is responding with. If you look at the connector properties, you need to locate the FQDN for your connector. For our purposes, we will assume the connector to be registered to mail.example.com.Step 2 – Request the certificate
The first step in the certificate process is creating a certificate request file. To make your life much simpler, this process should be run on the server the certificate will be installed on. There is a way to transfer the certificate to a different server, but there is no need to add the complexity to the process unless there is a real need. To create the request file, you need to launch the Exchange Powershell and use the New-ExchangeCertificate commandlet. The command should be:New-ExchangeCertificate -DomainName "fqdn" -FriendlyName "TLSCert" -GenerateRequest:$True -Keysize 1024 -path "filename" -privatekeyExportable:$true -subjectName "Subject" where "fqdn" is the FQDN for your connector, "TLSCert" is a simple name for your certificate request, "path" is what the filename is for the certificate request, and "Subject" is the distinguished name for your certificate.
For our example domain the full command would be something like:
New-ExchangeCertificate -DomainName mail.example.com -FriendlyName ExamplTLSCert -GenerateRequest:$True -Keysize 1024 -path c:\example.req -privatekeyExportable:$true -subjectName "c=us, o=Example Corp, CN=mail.example.com"
You can then work with the Certificate Authority of your choice to request the final certificate. Note: The subject name for your request is important. Most CAs will not process a certificate request is the Organization listed in the o= portion of the name does not have rights to the domain listed in the cn= portion. Note: Some Authorities will want you to provide them with the file itself, while others will ask for the text contents of the file. Please read the instructions carefully when requesting the certificate from your authority.
Step 3 – Install the certificate
Within a few days, you will receive the completed certificate file from your CA of choice. You now simply need to import it using the Import-ExchangeCertificate commandlet. Simply save the certificate file in an easily accessed location, such as the root of the C Drive. Then run import-exchangecertificate –path "path to certificate"The system will report back the "thumbprint" of the certificate. Pay attention to this as you will need it in the next step.
Step 4 – Activate the certificate
Now that the certificate has been installed on the local machine, you simply need to instruct Exchange to start using it. This is done with the enable-exchangecertificate commandlet. To do this, you run enable-exchangecertificate –thumbprint "thumbprint" –services SMTPNote: To save time and typing you can combine steps 3 and 4 into a single command line. The full command line would then be: import-exchangecertificate –path "path to certificate"| enable-exchangecertificate –services SMTP
Now that you have TLS configured on your Exchange system, you will likely want to create 3 separate Send Connectors on each of your servers responsible for sending messages to the Internet.
The first should be configured for "TLS Required" for your trusted partners, so that all traffic between you and your closest partners/customers is transmitted encrypted. The routing rules for this connector should be set such that the domain names of your partners are included in the connector configuration. This is done from the Exchange Powershell using the Set-SendConnector commandlet with the "-RequireTLS:$true" parameter.
The second send connector should be configured to never use TLS as described in the previous article, so you can simply add domains to the routing rules when you encounter an organization with an expired certificate or other TLS misconfiguration that prevents mail delivery. This is done from the Exchange Powershell using the Set-SendConnector commandlet with the "-IgnoreSTARTTLS:$true" parameter.
The last send connector will be the "de facto" send connector that will use "opportunistic TLS" to handle the majority of mail domains. This one requires the least effort as Opportunistic TLS is the default.
Friday, August 20, 2010
Step 4 – Setup an Internet Connector with TLS Disabled
Both Exchange 2007 and Exchange 2010 use Transport Layer Security (TLS) by default to encrypt mail traffic with any other host that supports it, whether that host is internal or external to the organization. This is good thing as SMTP, or mail traffic, uses a clear text protocol that is easily deciphered by anyone looking at traffic at any point in between a sender and a receiver. The last thing any organization wants is a sensitive email being captured and published.
TLS, like SSL, uses a certificate provided by a Certificate Authority such as an internal Certificate Authority or a public authority like Verisign or Thawte to encrypt the messages between any two mail hosts that support encryption. Unfortunately, Internal Certificate Authorities are not effective at securing traffic across the Internet. It is not because they are any less secure; it is because they are not trusted by all organizations on the Internet, unless of course your Internal Certificate Authority happens to be one of the major root authorities (not very likely).
One big mistake that a lot of organizations have made is the assumption that just because they aren't worried about their email while it is in transit they can skip this step. Unfortunately doing so will cause delivery problems with many organizations that do support TLS on their mail systems. This is because Exchange 2007 and 2010 are both configured to use TLS with an internal, self-signed certificate by default. Most organizations supporting TLS on their mail system will drop mail that comes with an incorrectly signed or untrusted certificate. This is because the security system cannot validate the messages authenticity. It is the mail system equivalent of the certificate error messages that appear on some websites only since the Exchange system runs as a service, there is no user interface available to ask someone to intervene.
If you are in an organization that does not wish to secure their mail system with a certificate from a public CA, no problem; you simply need to disable TLS on the primary Internet Send Connector. This is done from the Exchange Powershell using the Set-SendConnector commandlet with the "-IgnoreSTARTTLS:$true" parameter . This would need to be done on all Internet connectors.
For organizations that do wish to secure their mail in transit, I will dedicate a full article to that topic. One thing you will want to do in the meantime is to setup a send connector with TLS disabled. With this approach, you can simply add domain names to the routing rules for the TLS disabled connector when you have a partner that has misconfigured their TLS settings and re-establish mail flow. That will give you enough time to contact the partner and work through the TLS configuration issues.
Thursday, August 19, 2010
Step 3 – Publish an SPF Record
At this point, mail should be flowing pretty well. Your mail organization should be off most, if not all, spam lists. Mail should not be being rejected due to a lack of a reverse or PTR record in DNS for your Send Connector. Now how do we further ensure that this becomes the norm? One step would be to publish a Sender Policy Framework or SPF record for your mail domain(s).
A SPF record is simply a listing of what servers are "authorized" senders for your domains. You are essentially telling the world what host(s) should be considered valid for your domain and that if they receive mail for your domain from any other host, it should be dropped and not considered from your domain. This greatly reduces the likelihood of your true production servers being listed on any blacklist. SPF is one of 3 main mechanisms intended to ensure mail senders are who they say they are. The other 2 are Domainkeys IM and Sender ID. Sender ID and DomainKeys also try to tackle the problem of authentication, by publishing the public keys for the TLS encryption/signing of messages. While these are noble goals, they are overkill for the vast majority of organizations. I have never seen a native implementation of DomainKeys for Exchange, and while Microsoft has definitely backed Sender ID, its use is nowhere near as widespread as SPF. If you would like to see the full details behind SPF, their comparison of the 3 implementations, and SPF's full record syntax, see the Open SPF organization website.
Fundamentally, the SPF record is simply a TXT record inserted as another DNS record for your domain. As many organizations use their incoming server(s) also as their send connectors to the exclusion of any others, the most common SPF record is something similar to: "v=spf1 +mx -all". This allows hosts in the domain's MX records to send, but no other host. If you have an additional server called mailer.example.com that is used as a sender for either a web application or other reason, you can add that server to your SPF record using the "a" operator. That results in a SPF record that looks similar to: "v=spf1 +a:mailer.example.com +mx -all". There are many other options including support for including records from other domains and allowing or disallowing individual hosts by name or IPv4 or IPv6 address. If you need a more complicated SPF record than the 2 very simple examples, take a look at the configuration wizard provided by the Open SPF organization. It walks you through all of the various options and provides the final SPF text as an output. It is then, simply a matter of working with your DNS hosting provider to insert the appropriate record.
One quick note on the use of SPF records to help avoid unsolicited spam. If you use an Anti-spam appliance or service that makes use of SPF records as part of its checks, make sure that it is the host listed in your MX record, not a host which has the mail to be scanned forwarded to it by another host on your network. This is because the Anti-spam host will see the forwarded as the apparent host, rather than the real originator, which will cause the system to block mail for any domain that has an SPF record published. This was the cause of a significant mail delivery problem with a partner's domain at a prior employer of mine.
Wednesday, August 18, 2010
Step 2 - Get your Public DNS in order
When one first tackles the project of getting Internet mail delivered to their mail system, you are very quickly pointed to the need for getting an MX record published within your domain's public DNS zone. It is this record that tells all of the other mail servers on the planet where to route email destined for your domain.
What most do not tell you is the importance of getting both the forward (A record) and reverse (PTR record) DNS entries right for the server that is the send connector. In some cases this is the same server as the receive connector, but it does not need to be. It is very important that any server that is configured as an Internet Send Connector have both a forward (A record) and reverse (PTR record) published in DNS, and that these records exactly match what you have entered in the FQDN field on the general tab of your Send Connector. If this one server is hosting both the send and receive connectors, the MX record should also point to this same name. If your organization accepts mail for more than one domain, simply point the MX record in each domain to the same FQDN. There is no requirement that an MX record point to a server in the same DNS domain as the MX record.
You may be thinking, "Why is it so important that all of these names match?"… The underlying reason is that mismatched entries and a lack of a reverse DNS entry are used by most Anti-Spam services as a signal that mail messages from this host should be treated as Spam. Some organizations, such as AOL and Comcast, go as far as to outright block mail from hosts that do not have a matching reverse DNS entry. If your organization's email is to get delivered, you need to do everything you can to lower the suspicions of the Anti-Spam services.
You can check your organization's DNS entries quickly and easily using the tools at mxtoolbox.com. To look for the forward or A record of your server, simply enter a:Servername in the command box, where Servername is the fully qualified domain name of your server as entered in the FQDN of your Send Connector within Exchange. To look for the reverse or PTR record, simply enter ptr:IPAddress in the command box, where IPAddress is your server's public IP address. If the results of these queries are consistent, you are all set. If not, don't fret; the fix is not difficult.
Getting the forward (A record) entry published in DNS is no different than publishing any other address. You simply work with your DNS hosting provider to publish the name you have setup for your send connector just like you did when you added your MX record or published the WWW address for your domain by providing them with the full name and apparent IP address. It is the reverse entry or PTR record that is a bit tricky. This is because you cannot directly publish your own PTR record as you are most likely not the owner of the IP block your organization is using; your ISP is. You simply need to work with your ISP to publish the reverse entry. This is a common request and many of the larger ISPs have even added this functionality to their customer self-help portals. This approach only works though if you have a static IP address/range from your ISP.
If your Internet service is being issued a dynamic address, this above approach will not work. Assuming that you need to make sure your mail is delivered; you will then have a choice to make. You can either change your ISP service to one with a Static IP range and follow the instructions above, or use a "Smarthost". A Smarthost is simply another server or servers on the Internet that "Trusts you". This is usually a paid service where they provide you with a username/password combination to authenticate your mail server regardless of the IP address it is using at the time. It is these servers that then deliver your mail messages to their ultimate destination. Your ISP will often provide this service, so start with them 1st. It is important that you make sure that they do not provide this service for their customers as many ISPs actively block SMTP (email) traffic from their entire dynamic IP service range to keep themselves on good standing.
Tuesday, August 17, 2010
Step 1 – Separate your mail traffic from your browsing traffic
One of the biggest problems to having your mail delivered is being listed on one of the many available spam lists like Barracuda, SpamCop, or SpamHaus; an event called blacklisting. Once listed on these services, any messages sent to any organization that uses them will be actively blocked. For details on these types of lists, see the DNS Blacklist article on Wikipedia.
Unfortunately, getting on a blacklist is easy; getting off them is often not.
To see if your mail server is on any of the common blacklists, simply navigate to mxtoolbox.com and use their Blacklist tool. Just enter the public IP address of your mail server, click on the Blacklist Check button, and in a few moments you will see whether that address is listed on any of roughly 100 public blacklists. If you find that your mail server address is blacklisted, don't panic. Simply browse to the main website of the blacklist your server is listed on and read for instructions on how to request to be removed. Many times, they will provide you with greater detail on why you were blacklisted in the first place, such as an open relay, unsolicited bulk email, etc. Simply correct that issue, request the delisting, and unfortunately wait. It often takes roughly 1 business day to get delisted.
A common mistake made by many organizations that leads to blacklisting is the use of the same public IP address for the mail connector as the remainder of the organization's browsing traffic. While this configuration greatly simplifies the firewall configuration, it exposes the organization to potential blacklisting. This is because any machine on the network compromised by a spambot or other malware, whether it is owned by the organization or not, can lead to blacklisting. This is because all blacklist sites use the IP address to signal a block rather than the apparent DNS host or domain name. Since the IP address is the key, any machine that gets NAT'ed to the same address as your mail server can potentially result in your mail server being blacklisted, so the fewer devices sharing an address with your mail server the better.
While to implement this you may need to work with your ISP to get a slightly larger IP range on your service; but if you simply take the time to configure the firewall to separate the end-user traffic from the email traffic, you will save yourself a lot of problems down the road. If you are on a tight budget and need to cohost services on the same address as you really can't afford separate IP addresses for your major services, at the very least separate the server and workstation traffic to separate IP addresses. It is far less likely, but not guaranteed, that your FTP or Web Server will be the host of a spambot than the whole collection of workstations and laptops using the same firewall.
Monday, August 16, 2010
Getting your messages heard
For this inaugural week’s discussion, I thought it fitting to focus on something that has significant business impact everywhere: Getting your email messages delivered. Let’s face it; in today’s market, message delivery issues can cause significant business pain regardless of what business you are in. This is true to the point that one CIO that I worked for valued the uptime of their mail system beyond everything else in their environment, including the SAP system that allowed them to produce and deliver product. While this may seem extreme, he had this view because email is now pretty much the de facto delivery method for most business documents: contracts, change-orders, deliverables for some organizations, and even most sales leads start as emails. When you look at it that way, one can quickly see how message non-delivery has the potential of being perceived by customers as stalling techniques for your deliverables or even worse a lack of professionalism due to the lack of contact.
During this week’s discussions, I am going to be focusing on Microsoft Exchange-based messaging systems, but the vast majority of these items apply regardless of the messaging system you have; only the implementation details will differ.
Exchange is a very powerful collaboration tool that for the most part is simple to get setup inside an organization. While Microsoft has made the task of setting up a public mail connector rather simple with Exchange, they have not provided the same level of guidance to making sure that all of the supporting steps to make sure the messages sent via the mail system are given the best chance of successful delivery. This is because the setup wizard focuses almost exclusively on the setup of the internally facing portions of the system. There is very little validation of the public Internet environment into which the Exchange organization is supposed to function.
A few simple techniques and settings in your firewall and public DNS can make or break how reliable message delivery will be for your organization long-term. This week will focus on these tasks. While it may seem naive to think that a few changes that amount to only a couple hours work in most organizations can make such a huge impact, it was a lack of attention on these items that caused most message non-delivery problems from partners to my last organization.
Subscribe to:
Posts (Atom)