Showing posts with label Backup. Show all posts
Showing posts with label Backup. Show all posts
Friday, August 27, 2010
Backing up the Infrastructure Configs
If you are anything like me, you tend to forget about protecting the very fabric that ties everything together for your environment, the infrastructure components: firewalls, routers, switches, etc. To some extent this is understandable as these devices have become extremely reliable and, in most organizations, there is not the same degree of change within the infrastructure space as other areas. Even if you can understand it, the underlying fact is that when the infrastructure has a problem, everyone has a problem.
Luckily, most of the infrastructure devices in the industry are still using text configuration files to control their hardware. This coupled with the relatively low degree of change makes infrastructure backups a relatively simple task.
Thursday, August 26, 2010
Use VSS to Expand your Short-Term Restore Options
If your organization is anything like nearly every other organization I have worked with, you will find that the vast majority of file restore requests are from the very recent past. In fact, IT Today cites that industry-wide a full 40% of all restore requests are from the last 7 days. If the lion-share of all restore requests are going to be from such a small window in time, why not set yourself up to better service those requests? Especially when there is no extra software to buy and only a small price to pay in storage.
Every version of Windows Server starting with Server 2003 (Workstation OSes had this feature beginning with XP) has included a feature called Volume Shadow Service or VSS, which is capable of taking "snapshots" of the file system at frequent intervals, so that a view of what the system looked like at the specified time can be quickly produced. Unfortunately, very few of the organizations that I have worked with have actually taken advantage of this feature. Imagine the surprise on your user's face, when they ask for a file or folder from yesterday because they accidentally overwrote or deleted it, and you ask them what time they would like it restored from.
For details on how VSS works, see the Wikipedia article on VSS.
In the strictest sense of the word, VSS is NOT a disaster recovery technology as it is dependent on the file system that it is stored on. Since that file system is on the same server as it is protecting (and typically on the same volume as the protected data), you can quickly see that VSS cannot be guaranteed to be available to restore from should the server itself fail.
In a VSS implementation, you set aside a portion of a disk volume to be used for VSS Snapshots. This space is typically a part of the original volume, so there is no repartitioning necessary. You then setup a schedule of when the system should take snapshots. When the system runs out of space in its snapshot area, it simply removes the oldest snapshots until there is sufficient space for a new snapshot.
The first step in implementing a VSS solution is estimating the amount of disk space you need for your snapshots. There are a couple of ways to get a good estimate of the volume of the amount of change your system undergoes.
- If you do incremental backups of the system in question, simply use the average volume of backups for a period of time
- If you do not do incremental backups, simply run ROBOCOPY in list mode with the MAXAGE argument to see the volume of files that are changing per day or week.
To actually enable VSS on a disk volume, simply right-click on the volume in My Computer, Explorer, or Disk Management and choose Properties. Once the properties windows appears, select the Shadow Copies tab. You will then see a screen similar to the following:
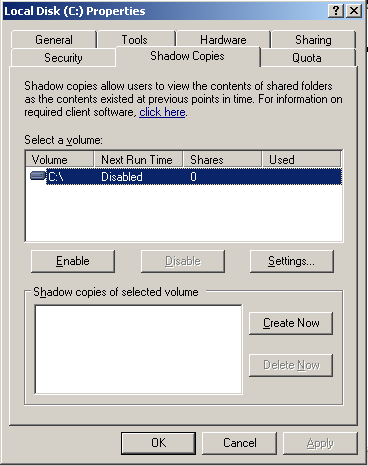
While you can simply click on the Enable button, I wouldn't recommend it as the defaults are likely not what you would choose on your own. The best course of action would be to select the Settings button, which will produce the following screen:
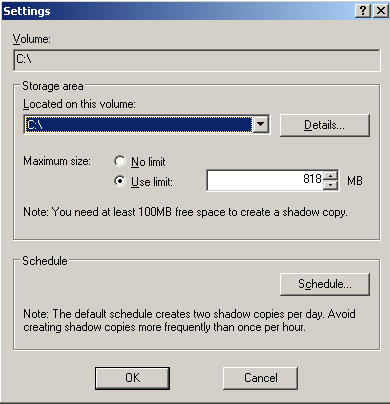
In most environments I have been involved with, there is not a separate volume on the system available for VSS snapshots and as VSS Snapshots should not typically be relied upon for true disaster recovery the default of placing the snapshots on the same volume as the data is acceptable. Simply enter in the amount of space you wish to reserve in the Use limit field. By default, the system will take 2 snapshots per weekday: 1 at 7AM and 1 at 12PM. If this is to your liking, simply click ok, and you are done. If you are anything like me, you would prefer more granularity than that. To change the schedule, simply click on the Schedule button and you will be presented with a screen similar to the following:

In most of the implementations I have been involved with, the multiple schedule use has been found to be unwieldy. As a result, most implementations I have seen have removed the second schedule, the 12PM item, and instead used the repeat task options available under the Advanced button options to have snapshots taken every hour or 2 during the business day. Click Ok to all of the windows and you are all set. Snapshots will begin to be made at the prescribed intervals.
Ok, we have all been in the situation where a server suddenly is nearly out of disk space. If you encounter this situation on a VSS enabled volume, simply lower the amount of disk space available to the VSS snapshots. The system will then begin removing older snapshots to meet the new, lower threshold.
To browse or restore historical files from a VSS volume, simply right-click on the folder you wish to view from any VSS enabled client (XP and newer OSes) and choose properties. Navigate to the Previous Versions tab. Select the snapshot from the time you wish to browse and click Open. Find the file(s) or folders you wish and view, copy, or move them as you need to.
Even without including the potential productivity gains from the end-user community due to less lost work, VSS quickly pays for itself as it is rare for a VSS restore to take more than a couple minutes. This allows you and the other support staff members to complete the restore request far quicker for the end-user community and move on to the next request.
Wednesday, August 25, 2010
Backup your AD Configuration
When you sit down and think about it, if you run a "Microsoft Shop" just about everything in your network environment likely relies on AD at some level. Whether it is the user accounts themselves and their associated mailbox properties for Exchange, the service accounts used by your applications, Group Policy Objects controlling workstation behavior, or possibly your infrastructure components due to DHCP, DNS, or even IAS. While Active Directory fully supports replication of all relevant fields and materials, there is still a need to get an offline backup of these vital materials. While no one truly wants to contemplate the scenario that would lead to such a restore, I have needed to assist at least 2 customers through this process; both due to virus infection. Lucky for me, they both had current backups of their AD environment using the process below due to prior consulting engagements.
Happily, getting a backup of your AD environment is an easy task and all of the tools needed have already been included with the operating system itself. Believe it or not, lowly NTBackup has a real purpose even in an enterprise environment and that purpose is snapshotting your AD environment. While many high-end backup systems do have plug-ins to backup AD, using them in a real DR scenario often adds a substantial amount of time to the recovery effort as many of them need an AD account just to run.
The first question is where to make the backup from. Ideally, you should have backups of 2 domain controllers in each domain of your forest. One of which should be made from a server holding an operations master role other than the RID Master, which should never be restored.
The 2nd question is where to write the backups to. You should choose a media that doesn't rely on a ton of other software or services in order to be read. Given the size of most AD backups and the fact that you don't need "point in time" restores of AD, flash drives have proven very effective at storing AD backups. If you are worried about the potential of your AD backup being used as a means of gaining access to your organization, feel free to use an encrypted flash drive such as those produced by IronKey.
For Windows 2003 domain controllers, all you need to do is run the following command from the appropriate domain controller to make the actual backup,:
Ntbackup backup systemstate /f "Path to the backup file"
For Windows 2008 domain controllers, NTBackup has been replaced by Windows Server Backup. Windows Server Backup is not installed by default on Windows 2008 systems. To install Windows Server Backup, go to Start -> Administrative Tools -> Server Manager. From there, click on Features, then Add a Feature. You want to add the Windows Server Backup feature. Once installed, the following running the following command from the appropriate domain controller will make the actual backup:
wbadmin start systemstatebackup –backuptarget:"path to backup folder"
This command line can be written to a BAT/CMD file for running from a scheduled task or manual process. It is important that the backup file get moved to media that can easily be transferred offsite in the event of a disaster.
Making the backup is only half the battle. One needs to be able to actually restore from it in the event of a disaster. To restore AD from this backup, one needs to follow these high-level steps for each domain in the forest, starting with the top most domain.
For Windows 2003 Domain Controllers:
- Build up a stand-alone server using the same OS version as the backup was taken from
- Place a copy of the backup file somewhere on the new server's filesystem
- Reboot the server and press F8 at the splash screen
- Select Directory Restore Mode Option
- Perform the restore from the Backup file
- Seize all FSMO roles held by nonexistent servers
- Cleanup the AD records for the DCs that no longer exist using NTDSUTIL
- Build up a stand-alone server using the same OS version as the backup was taken from
- Install Windows Server Backup using the steps above
- Place a copy of the Backup file somewhere on the new server's file system
- Run bcdedit /set safeboot dsrepair to instruct the system to boot into recovery mode
- Reboot the server
- At the login screen, select "other user". Enter ".\administrator" and enter the DSRM password for the server and press enter.
- Click Start, right-click Command Prompt, and then click Run as Administrator
- Run wbadmin get versions -backuptarget:"path to backup folder" -machine:"new dc name"
- Identify the version you want to restore. You will need to identify it exactly in the next step.
- Run wbadmin start systemstaterecovery -version:"version to be restored" -backuptarget:"path to backup folder" -machine:"new dc name" –authsysvol –quiet
- Run bcdedit /deletevalue safeboot to instruct the system to boot normally
- Reboot the server
- Seize all FSMO roles held by nonexistent servers
- Cleanup the AD records for the DCs that no longer exist using NTDSUTIL
Hopefully these steps are never needed, but it is good to know where to find them if they are ever needed.
Tuesday, August 24, 2010
Backing up Print Server Configs
Print servers are among my least favorite systems to have to recreate from scratch. Finding the right drivers for a plethora of different printer models is only the first step in the process. You then need to make sure that you have the right network and share settings for all the printers; then comes the fun of setting paper sizes, tray assignments, default finishing options, etc. Even in a small environment, it's enough to drive someone insane. Don't make the assumption that a couple of organizations I worked with did and find out the hard way that a System State Backup of their print server does not include the printer configs.
Fortunately, there is an easy way to address print server backups and there are only a couple "gotchas".
- You need to put the backup process in place BEFORE your print server fails
- This approach will only address restoring printers to a like OS. I.e. Windows 2003 32-bit -> Windows 2003 32 bit, not Windows 2003 -> Windows 2008 (If you are doing a scheduled upgrade, use the Print Management Snap-in)
- This approach will not address printers that store files outside of the Print Spooler folder structure, so many personal inkjet printers will not be covered
Note: The latest version of PRINTMIG for Windows 2003 does work in a Windows 2008 environment. I have not tested it with Windows 2008 R2 though. It may work. It may not.
Fortunately, PRINTMIG includes the ability to be controlled from the command line, so automating the backup process is simple. If you want to capture the print config to a CAB file of the same name as the server stored in the c:\backups folder, you simply need to setup a scheduled task to run:
PRINTMIG –b c:\backups\%COMPUTERNAME%.CAB
Then it is a simple matter of capturing the created CAB file to your backup media.
If you wish to restore, the configuration, you can simply run PRINTMIG and choose the restore option from the menu, or run:
PRINTMIG –r "Path to CAB File"
Now if you experience a print server failure, it is a simple matter of building a new server with the same name as the previous print server and running the PRINTMIG utility to restore the previous printer settings and drivers. If you need to build the server as a different name, no problem, PRINTMIG will restore the printer settings, to the new server regardless of name; however you will need to make other arrangements to change all of the end-user printer mappings to point to the new server.
At a previous employer, we had moved our print servers almost exclusively to dedicated VMs on VMWare's ESX server. This is because we could use a machine template and PRINTMIG to recreate a brand new print server in <15 minutes in the event of a system failure.
Monday, August 23, 2010
Backups: What and How
For this second week's topic, I thought that we should discuss backups. Every IT administrator I have ever met has had the fundamental need to have a backup of everything firmly engrained in their psyche. Some have had this need handed down from those before them; others from direct experience of not having them. Regardless of your past experiences, this need is likely there; but does everything in the environment need to be treated the same way? Most backup programs seem to think so; otherwise, there would be simpler and cheaper ways within their systems to have multiple media rotations and better support for "cheap" USB media for some materials.
Tape has a very proven track record and I am not saying that tapes should be avoided by any means. I am merely suggesting that tape may not be the best media for some of the data in an organization. Tape is an excellent method of retaining data for long periods of time, but is that really needed in all cases? Individual tapes have a relatively short life span when you look at the number of "write cycles" they support. As a result, tape becomes rather costly when it comes to backups with a short retention time as you just end up replacing the tapes in that rotation much more frequently.
If you take a hard look at the data in your organization that should be backed up, you will likely find that you can divide the materials into 2 categories: Data with a long-term retention need and data with only an immediate disaster recovery need.
Most user data (home drives, file system shares, mail, etc.) is going to fall in the first category. This is because one could reasonably expect a legitimate request for what a particular folder or mailbox looked like 3 months ago. It is this type of data that most backup systems are really meant to handle.
A fair number of items that fall within the IT group though do not have a need for that type of long-term retention. Would you really ever have a need for what drivers a print server was using 6 months ago? Would you really have a need to restore a workstation with an image that was replaced a year ago? These items really only need to be backed up to handle equipment replacements in the event of a disaster, so you only need to keep as many copies as is necessary to ensure that your DR need is met. Items that will likely fall into the DR-only need for your organization:
- Print Server Configs
- AD Backups
- Infrastructure (Switch/Router/Firewall/etc) configs
- System Images
- Software Installation Packages
- Archive Materials
- Incremental copies using a utility like ROBOCOPY or RichCopy to a USB Flash Drive/External Hard Drive that can be stored offsite
- Cloud-based backups from companies like Carbonite, iDrive, or Axcient
- Simple, offsite DVD copies of materials that don't change frequently, like system images
- A monthly tape rotation that is only kept for 2-3 months
Subscribe to:
Posts (Atom)